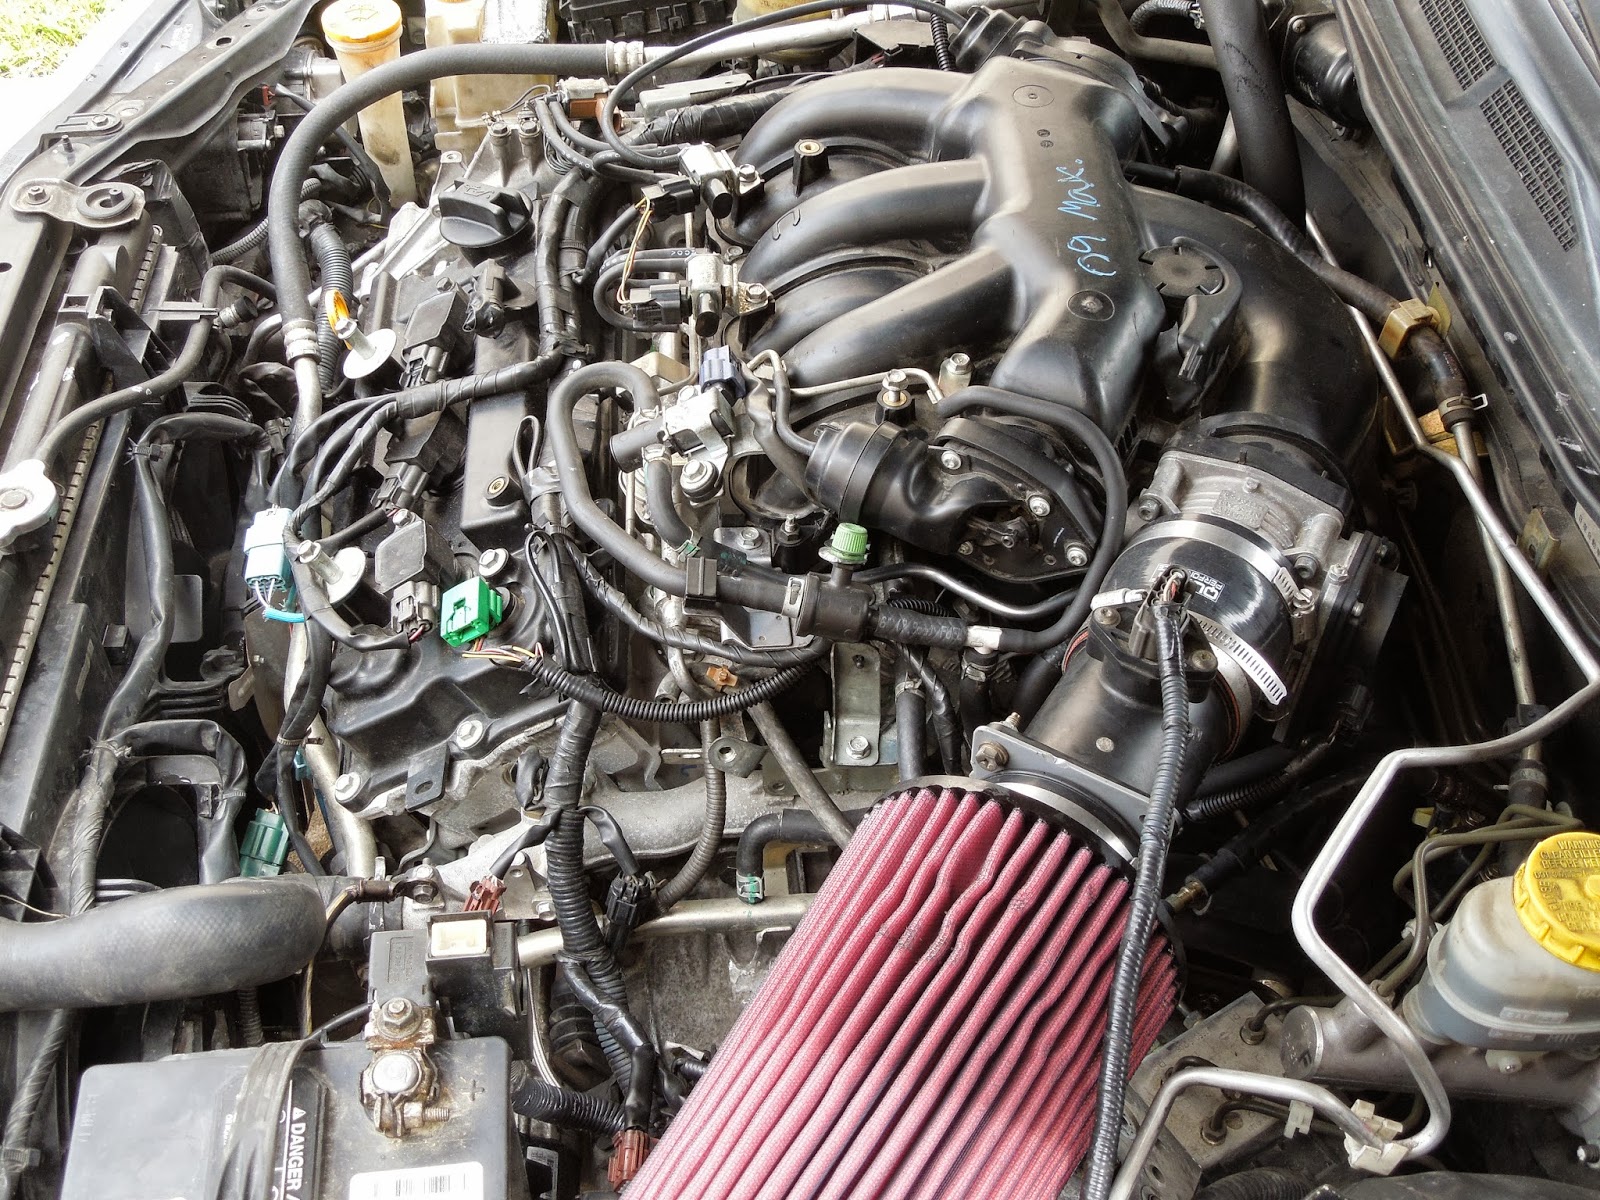
Ok the clutch is broken in, more little issues arise here and there from this being a complete project.
Oil leaks, belt squeals, etc, and my favorite thus far... Aligning the crankshaft position sensor (I'm using a RWD flywheel, cost less and they make lighter ones for the 350z/G35s).
Anyways, like I always advocate... Maintain your vehicle by modding it....
This is the 2J-Racing underdriv+lightweight pulley, and possibly the best pulley I've ever installed on any vehicle. Unlike what the forums usually say, you'll be hard to ignore the difference in performance on this one. This is money better spent than buying an intake.
Anyways, that's it for now, I still have a bunch of little things to tackle to finish the 6MT I35, just a minor update for now.
I will be going to the track soon, details will be posted here, so stay tuned...
I love this car, I really don't think there's a reason to do anything else after tackling the little swap issues that are coming up left and right (EG. My auto seat position doesn't want to function). But besides that drive-ability is fine (fixed the stalling out issue, vacuum leak, go figs!), mpg so far is 25 in the city (4-5mpg increase) and in the 30s on the highway (same increase), performance... Well.... ^_^
The Break-In Setup
Power:
08 Altima V6 Motor (Somewhere under 10k miles)
04 Sentra Spec-V Transmission + 02 Maxima Bellhousing swap
95-99 Maxima Exhaust Manifolds
95-99 Maxima Stillen Y-Pipe
Stock Cat (Under the car)
Stock Catback
$25 Intake setup
-$5 3.5" to 3" reducer hose + 2 hose clamps (Thanks to Steve @ The Hose Pimp!)
-$20 Some giant air filter I bought awhile back because it was stupid cheap and hell, big air filters just look cool....
Handling:
All stock plus my infamous front sway bar delete (I need new end links, didn't feel like connecting the old bad ones).
350z Track V1 18x8.5 wheels up front w/ 255/40 Conti-Pros (1st gear hooks now! I was riding on sawblades all the way around for the first 100 miles, and first gear got traction thanks to my LSD but I couldn't keep the car straight)
4th-gen Maxima Saw-Blades in the rear
Thoughts on the swap so far...
Based on my 3rd gear pulls, it seems that this car is a top end whore, 6500rpms are not enough for this setup as it appears, which is quite intriguing because only one of my VIAS's (Passenger side, the more important side based on trials w/ this motor in it's native vehicle) are working at the moment.
I also have a very boring low end, but I think this is mainly due to my awesome intake setup, one day when I am out of small swap issues to tackle I shall make a more proper intake for this car.
One big plus though is how quiet this car is, I think that's the main reason why I'm in love with it so much, I was expecting rasp w/ the stock cat and catback but it's handling it very well, only allowing a slight grumble to get though w/ no bees in a can sound (What you usually get when you start to make things flow better under the hood, but not out the muffler).
Really the loudest thing is the pop or two (I've witnessed black smoke while revving in neutral before) I get after each shift, I do wonder why it's happening because it was under my assumption that these motor swaps ran lean.... Something to ponder later. I can be a real judge of it when I actually make an exhaust for this car one day.
Another update when the interior resembles something of normalcy.
I updated the big main post, still doing epic revisions as time goes along, I think I'm going to split it up into a few sections... main article and then the How-To. I believe that there is just literally too much going on with this car to be in one post.
Excuse the run-ons, and unorganization, this is a regularly updated post as time goes on until the swap is finished and I can make a nice neat revision, I'm learning as I go along so be patient with me... Kay thanks.
12/21/13 - First Dyno!
235/195 on Jtran's Mustang Dyno, full post here!
08/17/13 - The IPL I35 Finally starts!
I have a bit of tidying up to do inside and outside of the car, but the first 6MT I35 is a runner!
09/06/14 - Full Bolt-On Untuned Dyno 257whp standard on a Dynojet. http://maxima.org/forums/dyno-discussion-slips/680978-aackshun-s-i35-6mt-dyno-thread.html#post8982633
The Journey of the first documented 6MT I35....
(From left to right: JNCORacer's I30, Carlos's Maxima, my BD and Max_Dreamer's Maxima)
Well, I've always beat to my own drum when it comes to things, and when I play with cars, I'm out there to impress myself, I always set out with the intention of making myself go "Damn, that's nice."
Ever since I was 17 after owning my first Maxima I had set in my head of what I wanted to accomplish in the world of sleeper sedans (What is a Sleeper? http://en.wikipedia.org/wiki/Sleeper_(car)).
One of my goals was to have a 6speed Manual Infiniti I35. I find it the perfect balance of luxury and sport, definitely to give a lot of early 2000 BMW/Lexus/Acura owners something to be upset about. For those of you who do not know, the I35 did NOT come in manual, only with the 4 speed automatic (Sluggish, yet reliable transmission, more for comfort and cruising, not fun), so I will have to complete yet another 6-speed swap but this around it seems easier.
Enough talk, here is the strategy for this one; The I35 S
My idea for this project was on a simple platform, I wanted to keep things stock, meaning I wanted to modify this car in a way so it will perform better in any way possible, but not loose any comfort of driving a stock vehicle (No loud exhaust or lowering the vehicle considerably on aftermarket wheels). At first I had the idea of doing the "Sport" package, which is popular for a lot of Infiniti's these days.
But I felt like the "S" idea was not a big enough departure from the norm, I felt like just calling it the I35-S was shortchanging the work I planned on putting into the car. I also played with the notion of going the "JDM" route, by calling the car it's original Japanese Domestic Market name the "Cefiro"
Then I decided this was too radical, rebaging a car and sticking a few "Nismo" (Nissan Motorsport) stickers on it didn't jive with me well, I felt that was just too much and trying "too hard"
Then one day it hit me, why not the IPL? IPL G's are rare and overpriced, but still they set themselves apart from the other G's without really standing out at the same time....
(A regular G37 on top, with the IPL model below)
That was it! The IPL! The perfect balance of setting this I35 apart from the other's without trying too hard!!
Till then I realized... No way would Infiniti do such a thing, if am going to stay true to the wolf in sheeps clothing ideal, I rather just undercut this car as much as possible, leaving no one with a warning of what they are about to encounter until it's too late.... So after some deep thought, I decided to only stick with the Sport Model I35 aka the I35S
Taking Action, time to begin doing work.
This was all kicked off by the death of my car's original motor around 190k (Maybe a post someday if I ever tear the old motor apart).
Day one, car in my storage w/ a dead motor.
Full Modification List:
Power: - 09 Altima Motor w/ 1,xxx Miles - 09 Maxima Intake Manifold and Throttle Body - 3" Intake Piping - 02/03 Maxima OBX Equal Length Headers - 2.5" Test Pipe - 2.5" "Godsnow" (Ebay brand) Catback w/ g35 Sedan Muffler - Fidanza Flywheel
- 2J Racing Lightweight Underdrive Pulley - OEM 03-06 350z Clutch Disc - OEM Nissan L31 Altima 5mt/6mt pressure plate
Exterior: - G35 S model emblem. - G35 Coupe 18" Wheels, reverse staggered tire setup 235/40/18s on front 225/45s on the rear. - 5k Morimoto D2R Bulbs
- Nyoka Hyper Yellow H3 Bulbs
- Nyoka Yellow Turn Signal Bulbs
Interior: - 02-03 Maxima Center Console
Suspension/Braking/Chassis- BC Racing Type BR coilovers w/ upgraded springs... 10k from 8k rear- Energy Suspension Poly Urethane Front Lower Control Arm Bushings- KnightYYZ Polyurethane Engine Mounts- Energy Suspension Shifter Bushings- 350z/G35 Dual Piston Brake Caliper upgrade + 12.6" Rotors utilizing Duralast Gold components all around
This started as a nicely modded 96 SE that was my daily to get me to work and back, as time went on and things broke, I decided to replace the part with a decent mod instead of the same thing, eg when I replaced the motor I did a DEK swap. I didn't get to fully enjoy the DEK swap because a friend came up with the right price and I sold it immediately. There are bigger things coming from this car in the future, stay tuned to hear more about this one.
1996 SE Maxima
-5MT
-Cold Weather Package
-Security & Convenience Package
-Black Leather
Detailed Mod List:
Powertrain
-2001 I30 Motor
+NWP Spacers
+Power Rod Delete
+"Seems Legit Racing" 95-99 Throttle Body Adapter
-OBX 02-03 Maxima Headers
-2.5" Test Pipe
-03 Maxima 6MT Transmission
-03-05 350z Clutch Disc+Pressure Plate
-Mobile 1 75/90 and Penzoil Synchromesh Gear oil mix
-Mobile 1 10w30
Suspension
-Ksport Coilovers
+Rebuilt by FEAL racing.
This post is a little late, but I've installed the infamous OBX 3.5 Headers on my car.
I do not have that many pictures, but here is a quick overview of the installation process, I will not go into gross detail, because the swap happened awhile ago.
Here is a quick overview on how to install/remove any type of header/manifold from most Maximas (95-03 for sure, 04+ guys this gives you an idea).
Installation (Sort of in order)
-Put the front end of the car on stands
-Remove Upper Intake Manifold
-Remove 02 Sensors
-Drop the Y-pipe
-Work on the front collector (6 bolts)
-Begin to unbolt the rear manifold (if you're really pro you can do all 6 bolts)
-Get the jack and support the engine/tranny
-Drop the crossmember
-Remove the rear mount thingy (4 bolts on the motor, it's what the rear mount attaches to)
-Drop the rear header
-Install OBX headers
-Delete EGR
Reverse process, starting w/ the rear mount thingy.
Video on Removing the Rear Manifold:
Problems/Things to know...
-There will be an EGR delete during this process, I'm still working a way around this so I won't have a CEL
-Two M18x1.5 bolts will be required (unless you're running a wideband and want to plug it into the headers) to block off the extra O2 ports.
-You can not put the rear o2 sensor on the rear collector, the steering rack is in the way, I used one on the front bank and one near the oil pan, use the screws on the rear collecter and the other o2 port near the oil pan.
-I had to extend the O2 sensor wires for it to reach the location pictured below.
-Get OEM nissan gaskets, atleast the O shaped one, people suggest re-using the old header gasket on your car, they say it's a superior design, I am using the OBX manifold gaskets and so far no problems, but if you really want to go the extra mile, order some new nissan manifold gaskets and O gaskets (remember you're still saving hundreds of dollars compared to cattman, so put that money to good use).
-The flexpipe on these headers aren't the world's toughest thing, sure you can install it out the box, but later down the line it will fail (Me from being lowered, bottoming out a lot), and I hear about other failures occuring because of how thin the inside wall is, so expect to replace the flexpipe on these a year or two down the road, the last two videos below will give a good inside + outside sound of a leaking flexpipe.
-You SHOULD grind off the lip of the crossmember, it's not necessary, but it prolonges the life of your flexpipe and kills down on cabin rattles.
-You SHOULD fabricate your own exhaust hanger after the flexpipe because the OBX's have none. Again, not necessary, but a good idea.
Onto the media/fun stuff....
Below are my collection of photos featuring the OBX 02-03 Headers and some comparison shots and what not....
OBX Headers (Top)
Stillen Y-pipe + OEM Rear manifold (Bottom)
OBX (Left)
Stillen Y + OEM Mani (Right)
These are not the correct ports to block off for a 4th gen, but this is just to give you an idea of what the bolts I used look like (Brought them form Home Depot)
This is where the Bank 1 O2 sensor should go on 95-00 (99-00 fed specs only) Maximas. You will have to extend the wire to get it here.
Drive around with your max like this, you will OWN THE ROAD (it is scary loud, see vid below).
Leaking Flex Pipe (Outside)
:Leaking Flex Pipe (Inside)
For more exhaust clips and videos check out my youtube (username dj_airman)